
 Home
HomeI fucking love eating shrooms.
Psilocybin mushrooms made me quit cigarettes. They made me a better communicator. They made me a better partner and a better father. All mushrooms, not just the psychedelic ones, have benefited my life and health in countless ways and I think more people should eat them.
Unfortunately, growing psilocybin mushrooms is very illegal in the United States despite multiple studies demonstrating their effectiveness at treating mental illness. I do not grow them myself. I have, however, had the privilege of extensively interviewing and spending time with mushroom growers. I’ve read many books on the subject and often hunt wild mushrooms in the forest. I am not here to recommend that you risk your freedom for the sake of a mushroom trip, but I am a huge proponent of making potentially helpful information freely accessible to all, so I’m going to teach you how to grow them anyway. All you need is about $200 and a long enough attention span to make it through this article.
Psilocybe Cubensis is the name of the mushroom most commonly cultivated at home. It likes hot, humid weather and can be found growing wild on cow patties all over the world. They need nutrition, water and light to grow. The cool thing is, once you understand how to grow one kind of mushroom, you know how to grow at least a few others as well. Lion’s Mane, Oyster mushrooms and Reishi are all commonly-grown at home for their good taste and potential health benefits.
“Edible and medicinal mushrooms can be grown at home and are fun and rewarding. Oyster mushrooms are one of the fastest, easiest and highest yielding mushrooms to grow. Loaded with vitamins and protein,” said Levon Durr, owner of Fungaia Farm in Eureka, CA and host of many “grow your own mushrooms” workshops.
You’re going to need to buy a few things before you get started:
- Two 66 qt Sterilite clear plastic tubs ($20 at any Target)
- Micropore tape (Can be found in the first aid aisle at a pharmacy or grocery store) ($10)
- Duct tape ($5)
- One bag of sterilized substrate (For our purposes think of substrate as mushroom dirt) ($40)
- One bag of sterilized rye berry grain ($27)
- One bottle of 70 percent isopropyl rubbing alcohol ($4)
- Non-powdered latex gloves ($15)
- Two clean spray bottles (spend the extra money for the good ones at the hardware store unless you want early-onset arthritis) ($15)
I recommend sourcing the substrate and grains from Fungstrate. It’s a small company run by a rad guy named Jason Quinn who comes highly recommended by most of the growers I follow. You can make the grains and substrate yourself easily enough but I promise this step is best left to professionals for your first grow.
There’s a ton of subtlety to it, it requires a pressure cooker and if you get it wrong it can mess up the whole grow. If you don’t like Fungstrate, there are tons of other companies doing the same thing that can be found with some light internet digging.
Something a bit tricky you’ll have to find are mushroom genetics, specifically Psilocybe Cubensis “Golden Teachers” which is widely-considered one of the highest yielding and easiest varieties to grow. Mushrooms grow from spores into “mycelium” on petri dishes and are then transferred to a jar of liquid, usually water mixed with a bit of honey or light malt extract, where the mycelium grows into a “liquid culture.”
LIquid culture is then injected into a bag of grain where it eventually grows into mushrooms. Spores for psilocybin mushrooms are legal to buy or sell in 47 states, but liquid culture of the same mushrooms is illegal because it’s technically a growing organism at that point.
Liquid culture is much easier to work with, and a lot of spore vendors sell them anyway. I am not going to tell you where to get them because that would likely get me and some other good people in hot water with the authorities, but just know if you look hard enough through Reddit and Instagram, you will find someone willing to ship you a 10 mL liquid culture syringe for $25-$30.
R/sporetraders on Reddit is a good place to start. If you can’t find any, you can legally order a spore syringe from countless vendors and follow the same method laid out in this article, but you’ll probably want to order a few extra grain bags because one or two are almost certainly going to end up contaminated before you get mushrooms to grow.
“Don’t breathe that stuff in. Mold is bad; mold is scary. I think everybody should be afraid of mold,” Quinn said.
Contamination refers to any sort of mold or bacteria sneaking its way into your grow. A common one is a fast-growing green mold called trichoderma, or “trike.” This is why you grow in a plastic tub. It creates a contained ecosystem and keeps all that harmful shit away from your mushies. A 2017 study showed that humans breathe in anywhere between 1,000 and 10 billion microscopic spores on a daily basis, so it’s basically impossible to keep out of your tubs indefinitely without spending a lot of money on professional lab equipment.
But don’t fret; you can still produce plenty of mushrooms for yourself and your friends before losing your tub to contamination, as long as you follow basic cleanliness rules. However, if you see anything growing in your tub that isn’t healthy white mycelium, specifically any patches of green, blue or black mold, do not open your tub in the house. Take it directly outside, and throw everything besides the tub itself into your compost or trash. If there are mushrooms inside, just toss them; they’re already covered in spores and will likely make you sick.
“In the weed industry, [trichoderma] is, I hear, good because it helps with the plants. Trike is your worst enemy in mycology,” Quinn said. “First sign of it for the most part there’s no turning back. Once you see green, it’s gone.”
Once you have supplies, you’ll need to make a still air box. This is a plastic tub with arm holes in it which creates a sterile workspace. A good trick for this is to find a metal coffee can; heat it up on the stove, and press it to the plastic of one of your tubs where you want your arm holes to be. It helps to offset the holes a bit, but it truly doesn’t matter as long as they’re evenly spaced. Once you pop through, smooth up the edges with a knife. This creates a small space to work without any small breezes or movements blowing spores into your clean grains.
“You can literally hit that with, like, your dab torch, the top of a metal coffee can, and you can melt a hole in the plastic in a sense,” said the owner of Humboldt-based shroom chocolate brand Humboldt Mycology (@humboldtmycology on Instagram), who spoke to me on the condition they be identified by their brand rather than their name.
The next step is to prepare a clean room. Turn off your AC unit or heater before doing this so there is no air blowing around your house at all. I would suggest using the smallest bathroom in your home, and clean the absolute shit out of it with 70 percent isopropyl rubbing alcohol or Lysol, top to bottom. Sanitize every surface you can and try not to inhale too many fumes. Spray the air with Lysol on your way out.
It helps to do this in as little clothing as possible because contaminants stick to clothes. Grab your sterilized grain bag, your liquid culture syringe or spore syringe (whichever you use should still come in syringe form and the process is the same for both), still air box, some alcohol and a pair of gloves and head into the clean room. Wash your hands, glove up, sanitize with alcohol and then clean all your supplies with alcohol, especially the still air box. Make sure no surface area is left un-sanitized while you work. After the outside of your grain bag is sanitized, place it in the still air box along with your liquid culture syringe.
“I stay clean, I try to brush my teeth and shower. It depends what I’m doing. If I’m in my lab I’ll take my shirt off and work with no clothes on sometimes,” the owner of Humboldt Mycology said.
Re-sanitize your hands before sterilizing the tip of the syringe with a torch or lighter until it’s red hot. If you’re being overwhelmed with alcohol fumes in a small space, WAIT to do this part until the fumes dissipate, lest you blow yourself to smithereens.
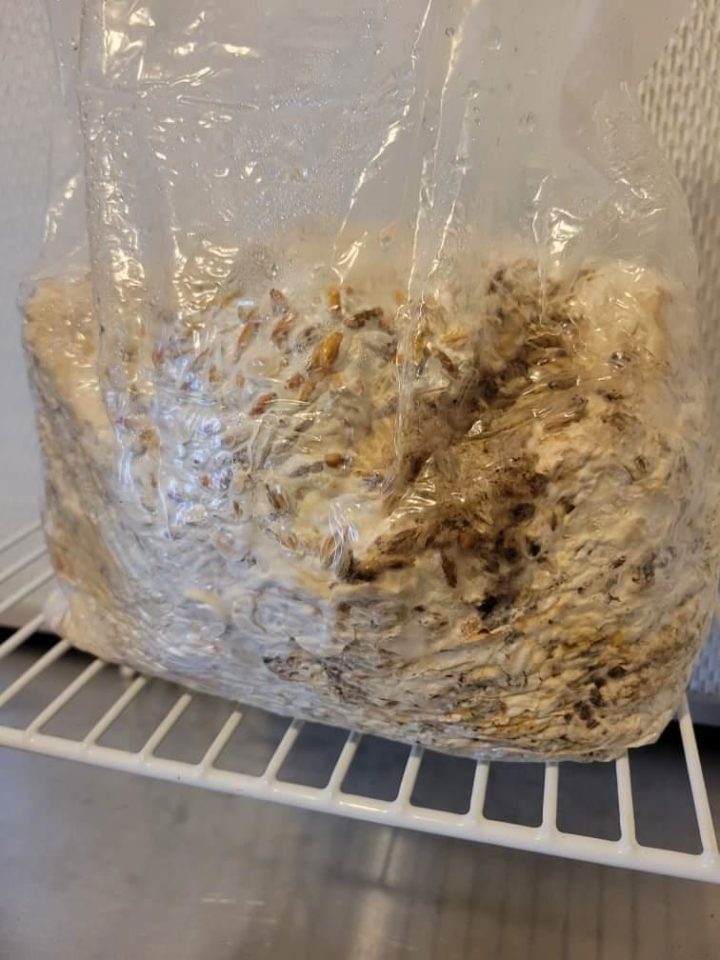
Sanitize the “self-healing injection port” which is the rubber piece on the bag that allows you to inject the liquid culture without opening the bag. Inject about half of your liquid culture into the grains through that rubber port, and you’re done for now. Store the bag in the dark anywhere you please, and let it “colonize,” which in this context just means grow.
“Be aware of your health. If you’re working in a small space with isopropyl alcohol, Lysol, and a torch, be cautious to not catch anything on fire.” Quinn said. “Properly dry your body and equipment of alcohol before igniting anything.” It’s as easy as sparking a lighter, and next thing you know, your arm is on fire.”
White mycelium will grow all throughout the grain for the next couple weeks. Once it’s about 30 percent “caked up,” it helps to work the outside of the bag with your hands and break the cake up so the mycelium will grow more quickly. Once it’s fully colonized, you’ll need to make a tub for the mushrooms to grow in.
Take the other tub you bought and drill two two-inch holes on the bottom of each long side and one hole just below each handle. A circle saw comes in handy here but a lighter and scissors work too. Clean up the edges and make sure no plastic pieces linger behind. Wipe the outside of the tub with rubbing alcohol and then cover each hole with a piece of duct tape.
“As cliche as it sounds I just go low and slow. This is a process where you’re only gonna have to drill your holes once; don’t be bummed about it taking a long time. Because now you have those six holes forever,” Quinn said.
Prep your clean room exactly the same way you did the first time. You won’t need the still air box this time. You’re going to need your substrate bag, your colonized grain bag and a good knife. Wear gloves, sanitize everything with alcohol and then use the knife to cut open the substrate bag, dumping all that good dirt into the tub. Do the same thing with the colonized grain. Mix all that together, breaking apart all the grain clumps with your hands to create an evenly mixed, flat layer of substrate and grain. Put the lid on the tub and you’re done. Store it somewhere dark.
Your tub should be stored somewhere that stays about 75 to 80 degrees. After about 10 to 14 days your tub should be covered in white mycelium and hopefully you’ll start to see little pins forming (baby mushrooms). Once you see that, take the tub back into your clean space and swap out the duct tape for micropore tape. This allows oxygen into the tub and triggers mushroom growth.
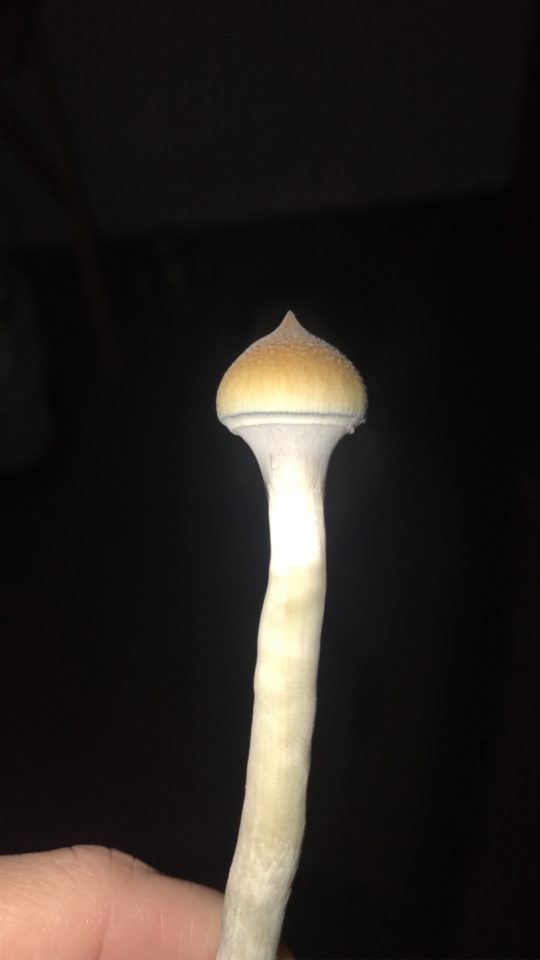
You’ll want to give the tub light for at least a few hours a day at this point. A desk lamp works fine for this. Wait another week or so, and you’ll have fully fledged mushrooms ready to be picked and dried. They’re ready to be picked when the veil that attaches the cap to the stem tears and the cap opens up. Keep picking them until they stop growing. If your cake doesn’t have any contaminants growing on it by now you can soak it in distilled water for four hours, drain, and it will continue producing a few days later.
Mushrooms are typically dried after harvest because they only last a few days in the fridge. Most home-growers use a dehydrator for this but those are expensive. If it’s not particularly wet or humid where you live you can just put them on a screen or rack and leave them under a fan. Once “cracker dry” they can be safely stored for at least a few months. I’ve eaten two-year-old, dried shrooms that still kicked but I would not recommend doing that.
“Making sure your mushrooms are super dry before storage is really important because, with the high levels of protein in them, you can grow some harmful molds and bacteria if they go bad,” Durr said.
This article is intentionally as brief as possible. Mycology as a whole is incredibly complicated; this is just the simplest and shortest way I could describe it for people who know nothing about it. You can do it a million different ways. I’ve heard of people growing directly out of bags of Uncle Ben’s Rice. The possibilities are truly endless and we still know so little about fungi and how they work. It’s a super fun hobby so do some reading on it and listen to a Paul Stamets interview if you’re interested.
“Take your time; you cannot rush it. My biggest tip is to never cut corners,” Quinn said.
I look forward to a future where Americans are able to grow these tools for healing right in their home without fear of legal repercussions. That day is yet to come. Be safe; don’t put yourself in harm’s way, but if you must, at least do it with the proper knowledge so you can help teach others, too.
Some books you should read:
- The Psilocybin Mushroom Grower’s Bible by Virginia Haze and Dr. K. Mandrake
- Mycelium Running by Paul Stamets
- Mushrooms Demystified by David Arora
*This article is not a recommendation that people break the law in any capacity. The punishments for psychedelic mushroom cultivation in all 50 states are incredibly severe. Any comments made by others in this article are to be taken as promotion of mycology as a whole rather than specifically promoting the cultivation of psilocybin-containing mushrooms.
The post How to Grow Shrooms for You and Your Buddies for Under $200 appeared first on High Times.


0 DL LiNKS:
Post a Comment
Add yours...