
 Home
HomeQuality pot photography is a time-honored tradition at High Times. If you aspire to take professional-level photos of cannabis, don’t miss your opportunity to learn to shoot pot like a pro in this pot-pic explainer.
Tools of the Trade
Let’s start things off with some photography basics and then move on to setup, lighting and post-production techniques. Many believe that photography is all about the equipment, but I’m going to show you how knowledge can overcome a lack of gear. You don’t need to spend a small fortune to create quality photos.
Now, what will you need to shoot like a pro?
- Camera (DSLR or mirrorless preferred)
- Lens
- Tripod
- Lights (strobes or continuous lighting with modifiers)
- Backdrops, tables, tents
- Computer and software
- Beautiful cannabis
If you don’t own a camera, the first thing I’d recommend is coming up with a budget. If you plan on using the same camera for video, you might be able to justify spending a little more money. If you’re short on funds, I’d recommend an older DSLR. You can find some great cameras online, many of them barely used. You can also find amazing deals on lenses, lights and everything else you might need.
My Pixels Are Better Than Yours
Many people get hung up on megapixels, but the truth is you probably don’t need as many as you think. I have incredible pot photos taken back when DSLRs only came with six megapixels! That’s why even older 18-megapixel cameras are good enough to create large, detailed prints and fabulous internet posts.
Most entry-level cameras come with a standard zoom lens, while high-end professional cameras are commonly sold as bodies only, with lenses sold separately. Lenses make a huge difference in photography, and using the right one is often the only way to get that shot you want. Camera bodies come and go, but a good lens will be with you for a lifetime. It’s not unusual to spend half your budget on lenses, so be prepared for sticker shock.
Lenses
Many cameras have a “crop factor” of 1.5x to 2x. This is because the camera body uses a smaller sensor than a traditional 35-mm, full-frame camera. However, to simplify, I’ll keep things in 35-mm terms.
Fisheye Lens (8 mm to 12mm)
Most everyone’s familiar with the curved, ultra-wide-angle shots produced by the fisheye lens. This lens is perfect for when you need to show your entire grow in one shot. But fisheye shots can be a real challenge to make interesting. The best tip I can give for using a fisheye lens is to think “near and far.” You need to fill the space with your subject first (near), then make the space around it work (far). It’s a lot more difficult than it sounds!
Wide-Angle Lens (12mm to24mm)
Most pros carry a wide-angle lens in their bag. If you want to show an entire greenhouse or outdoor grow without the distortion of a fish-eye lens, nothing beats a wide-angle lens. A good 16-to-35-mm lens can set you back a few bucks, but it’s a good long-term investment. A wide-angle lens emphasizes the feeling of depth and can show vast areas in just a single shot. If you want to make your grow site look huge, grab the widest lens you can find.
Normal Lens (35mm to 70mm)
Our eyes are equivalent to a 50-mm lens. Normal lenses have a reputation of being boring, but many pros make a living off this common focal range. When you need both wide-angle shots along with a few mild zoom shots, it’s hard to beat a 24-to-70-mm lens. A normal lens is great for taking photos of everything from greenhouses to staff portraits. Add an extension tube and you can take macro photos rivaling a true macro lens. Have you ever wanted one of those epic bud shots where the cola is in focus, but the background is a blown-out, soft, beautiful texture? A cheap, fast 50-mm, f/1.8 lens will give you those ultra-creamy backgrounds you’ve always dreamed about. It’s easy to find a used “nifty-50” lens for less than $100.
Telephoto Lens (70mm to200mm)
A telephoto lens is basically a telescope for your camera. A large telephoto lens will allow you to get up close and personal with faraway subjects. Telephoto lenses compress depth, making things appear closer together than in real life. This is great for that shot where you want to fill the entire photo with thousands of buds. Stand back, zoom in and fill the frame with endless stacks of colas. You can also isolate just one giant cola while blurring out everything in the background.
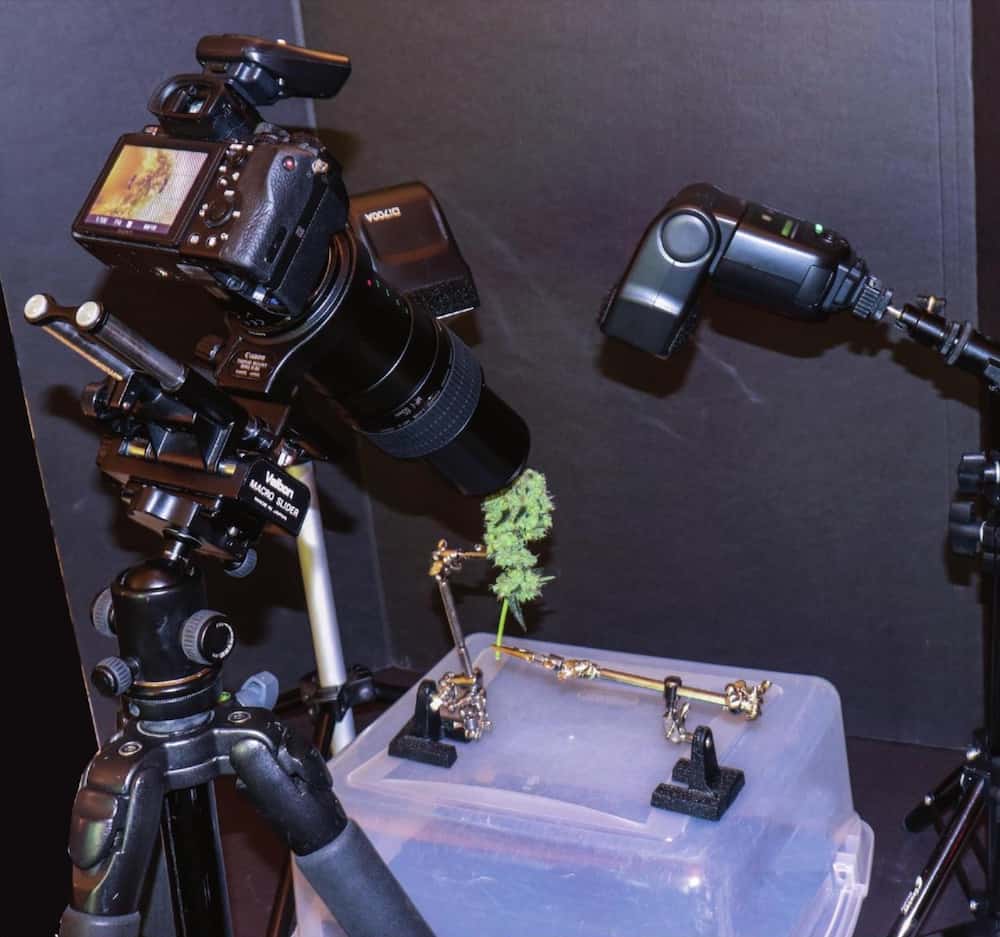
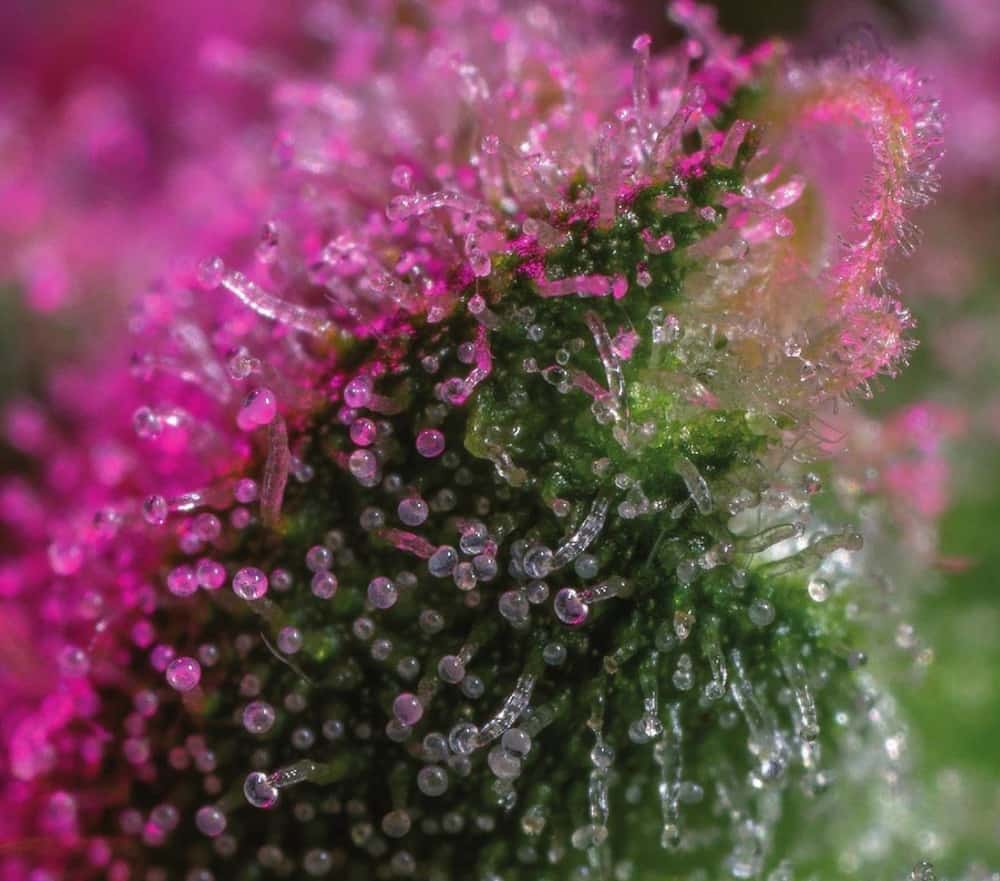
Macro Lens (50mm to 60mm, 90 mm to 100 mm, 150 mm to 200 mm)
A macro lens is used for extreme close-up photography and is one of the most valuable tools in your arsenal. If you want trichomes the size of trees, a macro lens is your best choice. One of the downsides of macro photography is its extremely shallow depth of field, making it hard to get everything in focus. Many macro photographers stack multiple exposures together to create incredibly detailed photos.
Tripod
Do you really need a tripod? The short answer is yes! A tripod will eliminate camera shake regardless of the camera’s settings. How many times have you been out taking photos in low light only to get home to a bunch of blurry photos! Sure, you can boost the ISO through the roof, but the noise will be extreme. Nothing beats a full-frame camera, low-ISO and long exposure for low-light conditions, and the only way to do this is with a sturdy tripod. A tripod will allow you to shoot long into the evening with no fear of blurry images. Since the camera placement doesn’t change between shots, you can take multiple exposures and combine them later in postproduction. Buy a good tripod and you won’t be sorry.
Lights
If you can’t get natural light, make your own. Photographers basically have two choices when it comes to lighting: continuous and strobe. Continuous lighting is the only choice for video, but it’s also very popular in digital photography. Modern fluorescent and LED lights (cold lights) work great and make the photo shoot much more comfortable than old-school halogen lights (hot lights). Flash photography (or strobe) is still the most popular lighting technique for many reasons. A strobe can be as simple as an on-camera flash or as complex as a professional power-pack system. The bright flash of a strobe allows photographers to use smaller apertures, keeping everything in focus. A simple flash can fill in shadows or create extreme drama. Flash is also great for freezing motion or creating special effects.
Hard or Soft?
How do you like your shadows? Soft boxes, umbrellas and colored gels allow you to change the feel of the photo. Modifiers allow you to create soft, delicate flowers or harsh, dramatic effects. Colors can evoke moods or feelings and can take a boring bud into another level of creativity.
Backdrops and More
One of the most overlooked aspects of cannabis photography is the background. When it’s time for your hero shots, backgrounds can make or break your photo. How many times have you seen a big, fat, juicy bud with a distracting, busy background? Don’t get me wrong, I love interesting backgrounds, but it’s hard to make the subject stand out when it’s competing with the background for attention. I always recommend using standard black-and-white backgrounds for product shots. Then it’s time to party with colored gels, vapes and other creative lighting techniques. You can spend a lot of money on backdrop stands, tables and other cool gadgets, but all you really need is a couple of foam-core boards to create amazing photos.
Subjects: Gas, Grass or Glass
If you’re shooting challenging products like cartridges or glass, make sure you clean and wipe everything down before you shoot. It’s easier to clean the dust off once than a hundred times later in Photoshop. Always double-check your products before you shoot. Think clean! A small photo tent is a cheap, effective solution for product photography and works especially well for controlling reflections while shooting glass. A circular polarizer can help you control reflections on plastic and glass (but it won’t help with metal).
Quality Products
We had a saying in the Navy: “Shit in, shit out.” The same concept applies to photography. Whether you’re shooting frosty colas or the latest vape cartridge, you need the best product to get the best shot. Pick your subjects carefully, and if you’re shooting flowers, don’t limit yourself to just shooting finished buds. Sometimes the immature white hairs will create amazing photos you could never get shooting late in the flower stage. Some flowers have the most amazing purple/magenta pistils that look boring after they die. Don’t miss out on some great photos just because no one else is doing it. Think outside the jar!
Let’s Shoot!
Now it’s time for the fun to begin. You need to start somewhere, so it makes sense to start from the beginning of the plant cycle. This is where the macro lens will come in handy. As soon as your seedlings pop, set up lights on each side of the plant. Your biggest obstacle will be the lens getting in the way of the flash. Many macro photographers use special ring lights just for this reason. I’ve found that using a couple of flashes can work just as well if you’re careful with placement. You can also set up next to a big open window and use natural lighting. The bigger the window, the softer the light.
Veg Out
Plants spend a great deal of time in the vegetative stage, but you rarely see many photos of them. Vegging plants don’t have the excitement of sticky, trichome-laden colas, but the photos are still necessary. People love seeing the entire life cycle of the plant, not just the finished product. Seedling and veg photos tell the whole story, not just the ending. A normal 24-to-70-mm lens is my choice for generic veg shots. I can get both wide-angle and close-up shots without having to switch lenses.
Your biggest challenge will be lighting, especially if you’re growing indoors. Many growers use some sort of “screen of green” technique and can’t move their plants. That means you may need to bring the lights to the plants. If you’re shooting outdoors, you can use the fill-flash technique and shoot anywhere you want. I prefer to hold my camera when the light’s bright enough but I always keep my tripod handy for when the sun drops. If you’re shooting in a light-assist/ light-dep greenhouse, have the farm turn off the lights so you can use all-natural lighting. Some of your best shots can come from inside a greenhouse using the roof as a giant soft box. Shadows cease to exist, and everything takes on a wonderful soft feel.
HPS Challenge
If you’re shooting indoors, that usually means shooting under high-pressure-sodium (HPS) lamps. HPS lamps can be a nightmare if you don’t know how to handle them. Think about all those orange/yellow photos you’ve seen over the years. Many of the them have those trademark angled bands that plague phone photographers. The problem is the light spectrum from HPS lights is completely different than normal sunlight. HPS lights are limited to the yellow/orange light spectrum. Much of the blue and green spectrum is missing, and photos tend to look like someone pissed on them. There are a few good solutions, but the easiest is to shoot with your camera in RAW mode. This allows you to adjust the white balance later in post-production. If your camera doesn’t support RAW mode, see if it supports using a custom white balance. I shoot in both RAW and JPEG mode, so I set my white balance using a piece of printer paper under the light. That way I know I have the correct color balance in my photos. To avoid the yellow/ orange bands, drop your shutter speed to 1/60th of a second. This will slow down the shutter enough to eliminate the bands.
Flower Power
Before long, your plants will get their legs. These are the shots everyone looks forward to. You can start getting bud shots as soon as pistils form. If you’re shooting outdoors, mid-to late September will give you some of your best shots. If the weather holds out, October may reward you with amazing colors and backdrops. If you’re growing in a greenhouse, you can use the same techniques you used for veg. Turn off all the lights and don’t forget to use your tripod. Sometimes I’ll mount a flash to a light stand and overpower the natural sunlight. This allows me to create a studio feel. If you can move the plants, then by all means bring them into a controlled, studio environment, but don’t be afraid to take the studio to the field.
If you’re in a greenhouse or outdoors, cut one of the better colas from the plant and bring it into a controlled environment for photos. You can set up a portable studio anywhere you have the space. If you have a lot of strains to shoot, the colas can be placed in water and set in the fridge overnight to finish the next day. Make sure you tag the strains so they don’t get mixed-up.
I use a couple of little alligator clamps used for soldering electronics to hold the buds. One clamp will hold most decent-size nugs, while two clamps will hold large colas without tipping over. The clamps allow you to position the bud for perfect framing.
Location, Location, Location
Light position is critical. If you want a soft, traditional-style photo, then the classic three-light setup works well. You can also substitute reflectors for lights, depending on the look you’re trying to achieve. Place your main (key) light at a 45-degree angle to the subject (the bud). Your second light (the fill light) will be placed on the other side to fill in the shadows. Your third light can be used to light the backdrop, or you can point it toward the subject to create a backlight or halo effect.
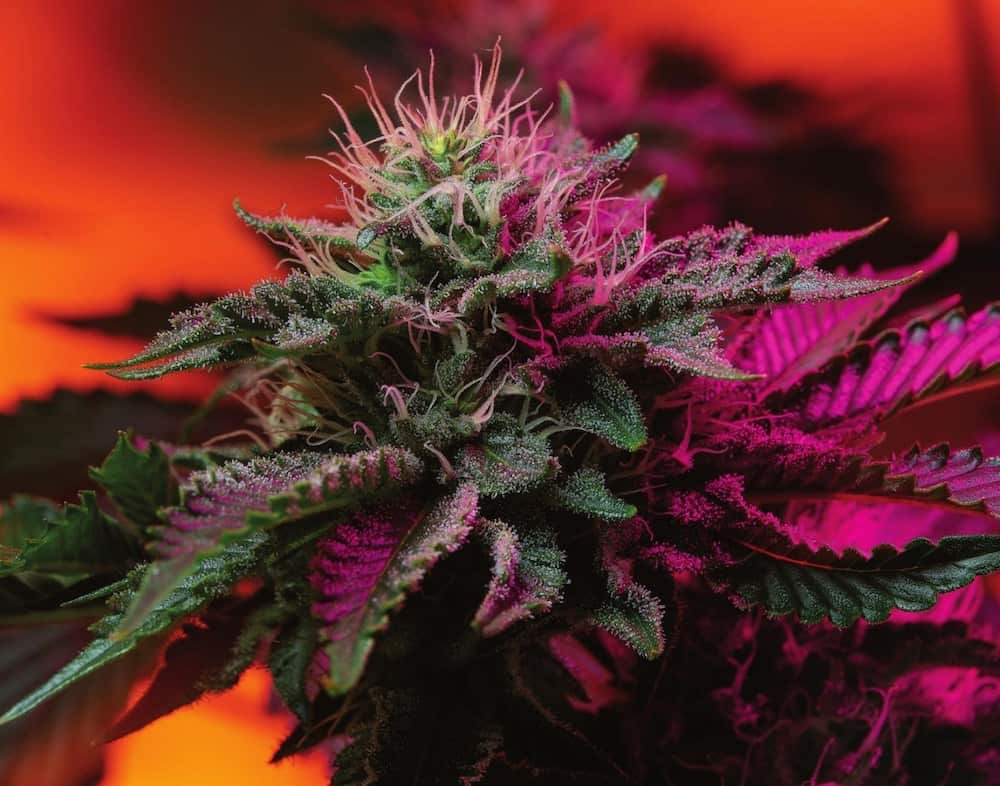
Light placement can make a huge impact on your photos. Traditional lighting layouts tend to flatter the subject. The light is soft without excessive contrast. By moving the light to the side while reducing the fill light, you can create high-contrast, dynamic photos. Moving the lights behind the flower can create interesting halo effects. Combine this technique with colored gels to create surreal-looking images.
Size Matters
Light modifiers can drastically change the look and feel of your photos. The physical size of your light source dictates the properties of the shadows. Placing a large soft box over the flash changes the shadows from sharp and harsh to soft, with lower contrast. Most of us are familiar with umbrella reflectors, a.k.a. brellas. The entire purpose of the brella is to soften the shadows so your pimples don’t look so bad. With no light modifier in play, the look is drastically different. The shadows are sharp and dramatic. However, with a soft box, the shadows are almost invisible, and the image takes on a soft feel. Both looks can be useful when shooting cannabis.
Gel of a Shot
Colored gels are a unique way to modify the look of your photos. Gels are thin, colored, transparent plastic sheets that can be placed over your lights. Point your colored lights at the background for amazing backdrop effects. Combine colors for even more unique effects. Set your camera to timer mode (five seconds) and add a vapor puff to the mix. If you time it right, you can get some amazing effects from the light hitting the vapor. Don’t be afraid to try new things!
What Up, Bud?
Finished bud shots are a staple of any cannabis photographer. Everyone loves to see what they’re going to smoke! These shots tend to be close-up photos. This is where your macro lens shines. Think about what your bud will be sitting on. Think about the color and texture. Be creative! Start with the same traditional lighting techniques you use for fresh flower. Play around with light placement to get the best possible shots. Many dispensaries need simple bud shots on white backgrounds, and it’s a fun way to pick up some extra work on the side.
Macro Vs. Micro
Traditional macro photography starts at a 1:1 ratio, or 1x. That means that the subject is the same size it would be on a 35-mm slide. I recommend a focus slider, as it will make life a whole lot easier. A tripod is required to get blur-free shots, and I even recommend a remote phone app or timer to make sure you don’t shake the camera while hitting the shutter. Even the slightest vibration can cause your shot to blur.
Mount your camera to the focus slider. If you don’t have a slider, skip the morning coffee as you’ll need a steady hand. Place your lights on each side of the subject, making sure the lens doesn’t block the light. Stopping down the aperture to f/16 to f/32 will bring more of the subject in focus, but at some point it will also reduce image quality. The main challenge with macro photography is the extremely shallow depth of field. The only way to get everything in focus is to take multiple images at different focus points. Start by focusing on the nearest point and work your way back. The more shots you take, the better chance you’ll be able to stitch together a useable final image.
Select the set of images in Adobe Bridge and select Tools>Photoshop>Load files into Photoshop layers. Now select all the images in Photoshop and use Edit/Auto-Align layers. Once it’s finished, select all the layers again and hit Edit/Auto-Blend layers. Use the stock blend settings and be prepared to be amazed!
Post-Production
I prefer Adobe Photoshop for post-production, but Adobe Lightroom also works well. If you shot your images in RAW mode, you can adjust the white balance, shadow detail, highlights, saturation and sharpening. After you adjust the photo to perfection, you can save it as a standard JPEG image. Select 90 to 100 percent quality for the least amount of compression and best quality. You can always resize the photos later.
Photography connects culture, ideas and people. It freezes a moment in time that will never exist again. History has shown that even a simple photo can change people’s lives. I’d like to think this article might inspire you to pick up a camera and give it a shot (pun intended). If a photo is worth a thousand words, what’s a bud shot worth?
Originally published in the October, 2019 issue of High Times magazine. Subscribe right here.
The post How To Photograph Pot Like A Pro appeared first on High Times.


0 DL LiNKS:
Post a Comment
Add yours...